I love this time of year and the strangely predictable chaos it brings. The weather is wild, schedules are filled with vacations and gatherings and other fun things, but the big events are always worth looking forward to. Often held in the first week of August, the White Marlin Open fishing tournament takes place in Ocean City, MD – people pour into town to see the boats, the tournament weigh-ins, the shopping, and the general buzz of excitement you can feel throughout. Family used to fish the tournament, but now we all just go down, enjoy the boats, eat some Mahi fingers and bake like potatoes on the Assateague Island seashore – a little vacation from the busy life back home. Often, my little sister’s birthday falls across that week/weekend, so it becomes a joint celebration of a fun fishing tournament and birthday.
This year, I attempted to make a sushi cake I found on Instagram… and let me tell you, it was proof that I can’t get it right 100% of the time and that sometimes you really, really need to read the directions. I also should’ve noticed that her recipe was in a 7 inch bundt silicone pan, so when I proudly pulled out my big fancy 12 inch cast aluminum bundt pan and shoved heaps of rice, avocado and imitation crab into it, I should have known I was going to have a bad time and a big mess. Maybe I’ll try it again another time. (I won’t…)
That aside, I love that it’s the last month of humid summer evenings where I can sit outside with a nice glass of blanc de blancs, see the stars and think about all the cool stuff going on in my life. It almost invites that sentimental (and sometimes almost cheesy) feeling of gratitude because it’s so much easier to just take inventory of the good around you. Work is always busy because the teams are working on a skeleton crew with vacations going on; late nights with late sunsets allow for just a little more time to relax on the deck before heading to bed; better weather means less excuses not to head to the oyster bar in the city with handsome new friends. When I was younger, the first part of August was also somewhat of a last-hoorah before a new school year, so there’s this heightened anticipation and excitement about new beginnings, even if it’s somewhat in the middle of the year.
Tomorrow marks a new moon in Leo – which also lines up with the Sun currently in Leo. This is a time where competition, creation, confidence and fun are at a peak – which makes sense, we’re in the heat of summer! This time of year always catches me having to make decisions that are either spontaneous, adventurous or just generally pushing me out of my comfort zone, so I see this new moon tomorrow as something to really kick off a new state of mind for myself, and I hope you do, too.
To honor a new beginning, write down a new hobby, a new habit or anything else you want to invite into your life on a piece of paper. To capture some moving energy of everything buzzing around you, put it out tonight on your deck under a large rock or crystal, or a glass container of water. I like to use this as an opportunity to put it out into all that good energy moving around to help kickstart my changes. After all, what you put out is what you get right back.
Save this recipe for fall, or for a day where using your oven doesn’t make your house feel like Dante’s Inferno. I couldn’t resist something cheesy and tasty, so I just had to make it anyway. Cottage cheese is always having a moment in my life, and I get around those weird chunks by just pureeing it and putting it back in its container. If you’re equally weird about texture but want to lighten up your cream-based dishes, try the swap. Enjoy!
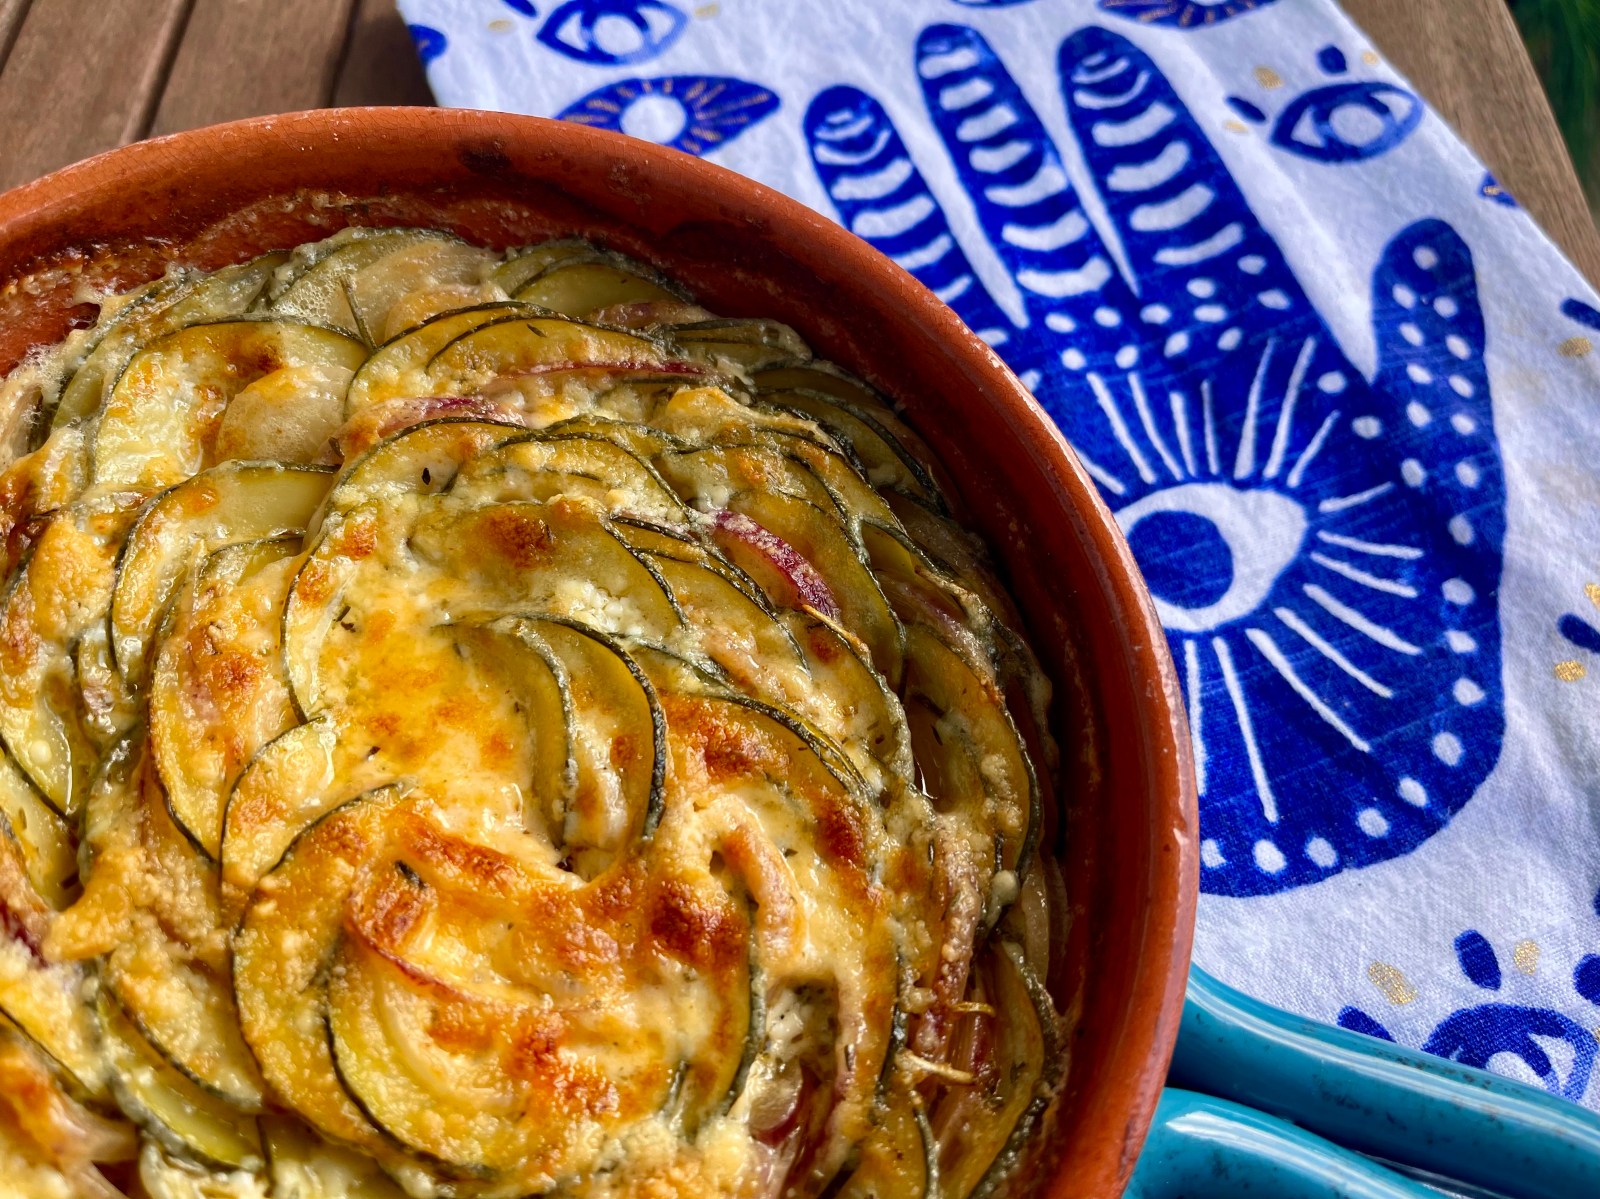
Zucchini Gratin with Roasted Shallots and Pecorino (Gluten Free!)

Prep time: 20 min (active time)
Cook time: 45 min
Makes 4-5 servings
Ingredients
- 1 medium/large zucchini, sliced to about 1/8th inch (we’re almost going for thick potato chip thickness… use a mandolin slicer if you can, I love this one); should yield 2 packed cups of slices
- 3 large shallots, sliced very thin (also sliced on the mandolin)
- 1/3 cup heavy whipping cream
- 3/4 cup cheddar, shredded
- 2 cloves garlic, finely minced
- Pinch of paprika
- pinch of Italian seasoning (a sprinkle of oregano, thyme and rosemary if a mix is not on hand)
- 1/2 cup cottage cheese, pureed to remove the curds/chunks
- Olive oil to grease the dish
- Grated Pecorino Romano (I love Locatelli brand)
- Salt and pepper, to taste
Directions
- Recommended to do ahead: slice your zucchini and lay flat in a single layer. Sprinkle generously with salt – this will draw the excess water out of them. I let mine sit out for hours – I realize this is not time-effective, so sometimes I’ll even slice them overnight and throw them in the fridge. Once the salt visibly draws the moisture out of one side, I blot them dry, flip them, salt the other side and do the same, blotting the salted water off before using.
- Once ready to prepare the dish, preheat your oven to 400 degrees F.
- In your baking dish, drizzle and coat with olive oil. Alternating your zucchini slices and shallot slices, arranging in a pattern of your choosing. The spiral is pretty, but laying them flat and layered like scalloped potatoes is perfectly acceptable as long as you make sure the sauce gets around them all!
- Once arranged, move to mixing the sauce. To ensure your sauce texture is consistent, I first puree my cottage cheese with my cream with an immersion blender first but use whatever blender you’ve got.
- Once your cottage cheese and cream are blended, add to a saucepan over low heat, along with your cheese. Add in your seasonings and garlic. Stir frequently to prevent burning; mix should be brought to a simmer/bubble, but not boil. Season generously with salt and pepper to taste – remember, the zucchini will soak this up and reduce the salt flavor.
- Your mix should be quite thick, but not goopy, and fully incorporated. While it’s still hot, pour your sauce over the zucchini and shallots, gently shifting the dish around to allow the sauce to sink down around the zucchini.
- Generously sprinkle your grated Pecorino over the top. Cover with foil, and bake for 40-45 minutes, until the zucchini is visibly tender.
- Remove the foil carefully and continue baking for another 10 minutes. If your pecorino has absorbed, I like to sprinkle more over it so it can get brown and bubbly. More is better.
- Remove from heat and allow to cool for 5-10 minutes before serving. Don’t panic if it looks watery – it will settle and firm up once it cools a bit.
Considerations – while I have not tried this swap with zucchini, you can try to sub full fat coconut milk, coconut cream, nutritional yeast and LOTS of seasoning if trying to avoid dairy. I would not recommend most non-dairy milks in this recipe because of the water content, but you can always experiment and let me know how it turns out!
Enjoy,
-S