
Spiced Chicken Tostadas (Paleo)
I’ve been feeling really sluggish recently. There’s been a lot going on in the world, and as a worrisome little empath, I’ve found that avoiding the news is probably the best tactic (albeit a selfish/ignorant one). So much destruction down south from hurricanes Harvey and Irma, a president that could double as a candied yam, work issues, and lots of ups and downs in life including not getting a good nights’ sleep in weeks… it’s a stressful time, these days.
As with every Sunday, we were deliberating what to make for the big group. We had some odds and ends to cook with… and while Sundays are for getting creative, we really just felt too out-of-sorts and tired to make it to the store for more ingredients. After some digging in the freezer, several chicken thighs made their way onto the smoker for some slow roasting. Great! One step down. Chicken it was.
After more digging around in the freezer, we were able to find a bit of frozen corn, and a bag of corn tortillas. Continuing to scavenge around the kitchen, we pulled some sweet potatoes, a little box of grape tomatoes and a can of black beans. That’s when I knew we were onto something good. No impromptu trip to the grocery store, here! I was tired, thank God.
Tostadas! Delicious, easy, throw-together food you eat with your hands. Perfect. But, in typical Sarah-fashion, it had to be different…. I was going to smother the crap out of everything with spice. Spiced everything. They’re actually pretty easy to make, which I love. There’s a few steps, but this was definitely a “win” in the dinner book… and after our worrying that we would have to go out, spend more money, more time and more effort, there’s always a way to make it work.
This actually made me think about a recurring theme in my life. I can remember being young, and watching some movie that I probably stayed up late to watch because I wouldn’t normally be allowed to. It was some sort of action movie, and while I don’t remember the plot or details, the guy, the main character, was trudging on after literally having his arm nearly ripped off, his people killed… everything. I’m not sure why it made such an impression on me, especially since it was so long ago, but I do remember that for days after, I noticeably heard people reassuring themselves or someone else “well, there’s always a way!”
This rings true even today. There has been a lot of obstacles out there, both in my life and in others’ lives. With enough perseverance, motivation or sometimes downright foolishness, the only way to go was forward towards the light at the end of the tunnel. With enough praying, enough deliberating and belief that all problems come to an end, there is always a way. Sometimes you’ve already been given your tools, other times you need to go find them. Regardless, never turn down an opportunity to shine and come out on the other side, even if it means you’re going to have to go through the mud. As long as you can see a chance for growth – it’s the right thing to keep going until you find a way.
I hope you enjoy these as much as I do 🙂 There’s a few parts to this recipe, but feel free to swap things out as you choose.
Note: this recipe includes non-paleo alternatives for flexible dieters – substitutions may be made.
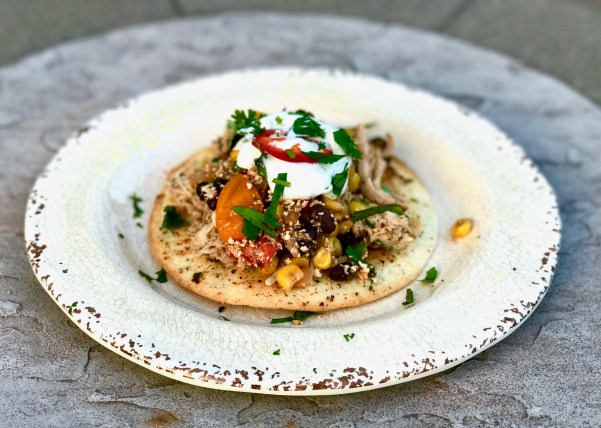
Paleo Spiced Chicken Tostadas
Prep time: 45 min
Cook time: 50 min
Serves 6-8
Ingredients:
For the Chicken:
- 6 chicken thighs, skin on
- 2 tbsp taco seasoning, plus more to taste
- 1 tbsp avocado oil
For the tostadas:
- 8 almond-flour tortillas
- 3 tbsp avocado oil
- 1 tbsp parsley
- 1 tbsp garlic powder
- ½ tsp sea salt
- ½ tsp pepper
- ½ tsp onion powder
For the “sour cream”:
- 4 oz refrigerated coconut cream (or Greek yogurt for those flexible with dairy)
- 2 tbsp cilantro, chopped
- juice of half a lime
For the succotash (non-paleo, optional):
- 8 oz frozen corn
- 8 oz grape tomatoes, halved
- 1 medium yellow onion, finely minced
- 1 8 oz can of black beans
- ½ tsp sea salt
- juice of half a lime
(corn and beans can be removed, tomato and salsa mixture is also delicious)
Optional:
- Sliced jalapeños for garnish
Directions:
- For the tostadas, mix together avocado oil, parsley, garlic powder, sea salt, pepper, onion powder in a small bowl. Lay tortillas out on a parchment lined baking sheet, careful not to overlap.
- Brush them generously with the oil mixture, making sure to cover the edges.
- Bake or grill at 400 degrees F, until crisp (but not quite charred). Once finished, set aside on a baking rack to cool. Keep grill or oven running at 400 degrees for the chicken.
- Place chicken on a large plate or baking sheet and brush with avocado oil. Generously coat the chicken with spice mixture, covering the entire outside. Grill for 20-25 minutes until chicken is done all the way through. Remember to get a clean plate from the first one you used! 🙂
- While the chicken is cooking, start the veggie succotash. Start by putting a very small amount (~ 1 tsp) of avocado oil in a pan, over high heat – we want these to stay a little dry. Add tomatoes and onion (corn and beans can be added if not strict paleo). You want to sauté the veggies over high heat so that they brown quickly, but still stay a bit crisp. If you find they start to burn, continue to stir and turn the heat down a bit.
- Season veggies with salt, and continue to cook for 8-10 minutes, stirring constantly. Remove from heat and set aside in a bowl. Mix in cilantro, ½ of the lime juice, and a pinch more of salt, if needed.
- Take a 1 minute break to find a margarita or beer, because this is sort of time consuming.
- Back to the chicken. When it’s cool enough to touch, remove the skin and shred with fingers (or a fork to avoid getting your hands messy), also removing the bone. Taste the chicken, and add any additional taco seasoning with another tsp of avocado oil, if needed.
- Lastly, mix together the coconut cream (or Greek yogurt), other half of lime juice and cilantro in a small bowl.
- Arrange ingredients on a tostada and serve. Enjoy!
-S


 It means sweater weather is close. It means that all the money that I spend at
  (Though it’s definitely important to note that these brownies are paleo, vegan, gluten-free deliciousness……….)
 Prep Time: 20 min